17 April 2020 - 12 May 2020 (week 01- week 09)
Soo Wen Yi (0334653)
3D Modeling _
LECTURES_
No Lecture _
17 April 2020 (week 01)
We are briefed by Mr Kannan on the exercises and projects for this module. Project 1 will be hard surface modelling, anything with sharp edges or geometrical shapes belong in this category. And Mr Kannan opened to stylised things, not necessary to be realistic. Project 2 will be organic modelling, anything with curves or in nature belong in this category. And the final project is themed based, we have to come up with the theme, story, pose.
Lecture 01 _
24 April 2020 (week 02)
We learn more about smoothing this week and how it works, and to keep switching from the smooth view back to normal view.
INSTRUCTIONS_
EXERCISES_
Week 01
17 April 2020
Exercise 1
We are started in Autodesk Maya with Mr Kannan showing the basics. And so for the first exercise we are to make chess pieces, except for the horse (knight piece) we can do it if we want to try.
 |
| Fig. 1.1: the chess pieces that I decided to model |
Here are some progress screenshots.
 |
| Fig. 1.1: started in a new scene after class |
 |
| Fig. 1.2: tried to manually turn the beams but its not working |
 |
| Fig. 1.3: I remembered the channel allows us to enter specific number |
 |
| Fig. 1.4: repeated for the last beam |
 |
| Fig. 1.5: repeated same steps for queen piece |
 |
| Fig. 1.6: repeated same steps for king piece |
After completing the 5 pieces, I wanted to try to model the knight/horse. But it posed to be a hard one after I started so I gave up and here's what I have for that piece.
 |
| Fig. 1.7: incomplete knight piece part 1 |
 |
| Fig. 1.8: incomplete knight piece part 2 |
 |
| Fig. 1.9: incomplete knight piece part 3 |
Aside from that, here is the final completed chess pieces.
 |
| Fig. 1.10: final chess pieces |
 |
| Fig. 1.11: final chess pieces |
 |
| Fig. 1.12: final chess pieces, front and top view |
 |
| Fig. 1.13:final chess pieces, right and left view |
Week 02
24 April 2020
Exercise 2
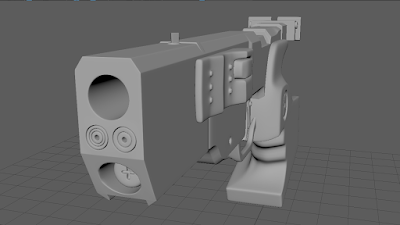
We are to pick a gun and model it, I wanted to a gun with a design that I liked so I had the motivation to model it. After looking at different guns I found one that I liked called Walther SSP, I really like the design of this gun and an obvious challenge in this gun is the grip.
 |
| Fig. 2.1: references for the gun I chose |
I started with blocking off the shape and build from there, here are some process screenshots.
 |
| Fig. 2.2: blocking |
 |
| Fig. 2.3: modeled one half first |
 |
| Fig. 2.4: process |
 |
| Fig. 2.5: after adding the dots/bumps the button became more rigid and I had to fix it manually |
 |
| Fig. 2.6: preview of one half |
 |
| Fig. 2.7: I discovered a new way to make a circle without using boolean |
 |
| Fig. 2.8: after smoothing |
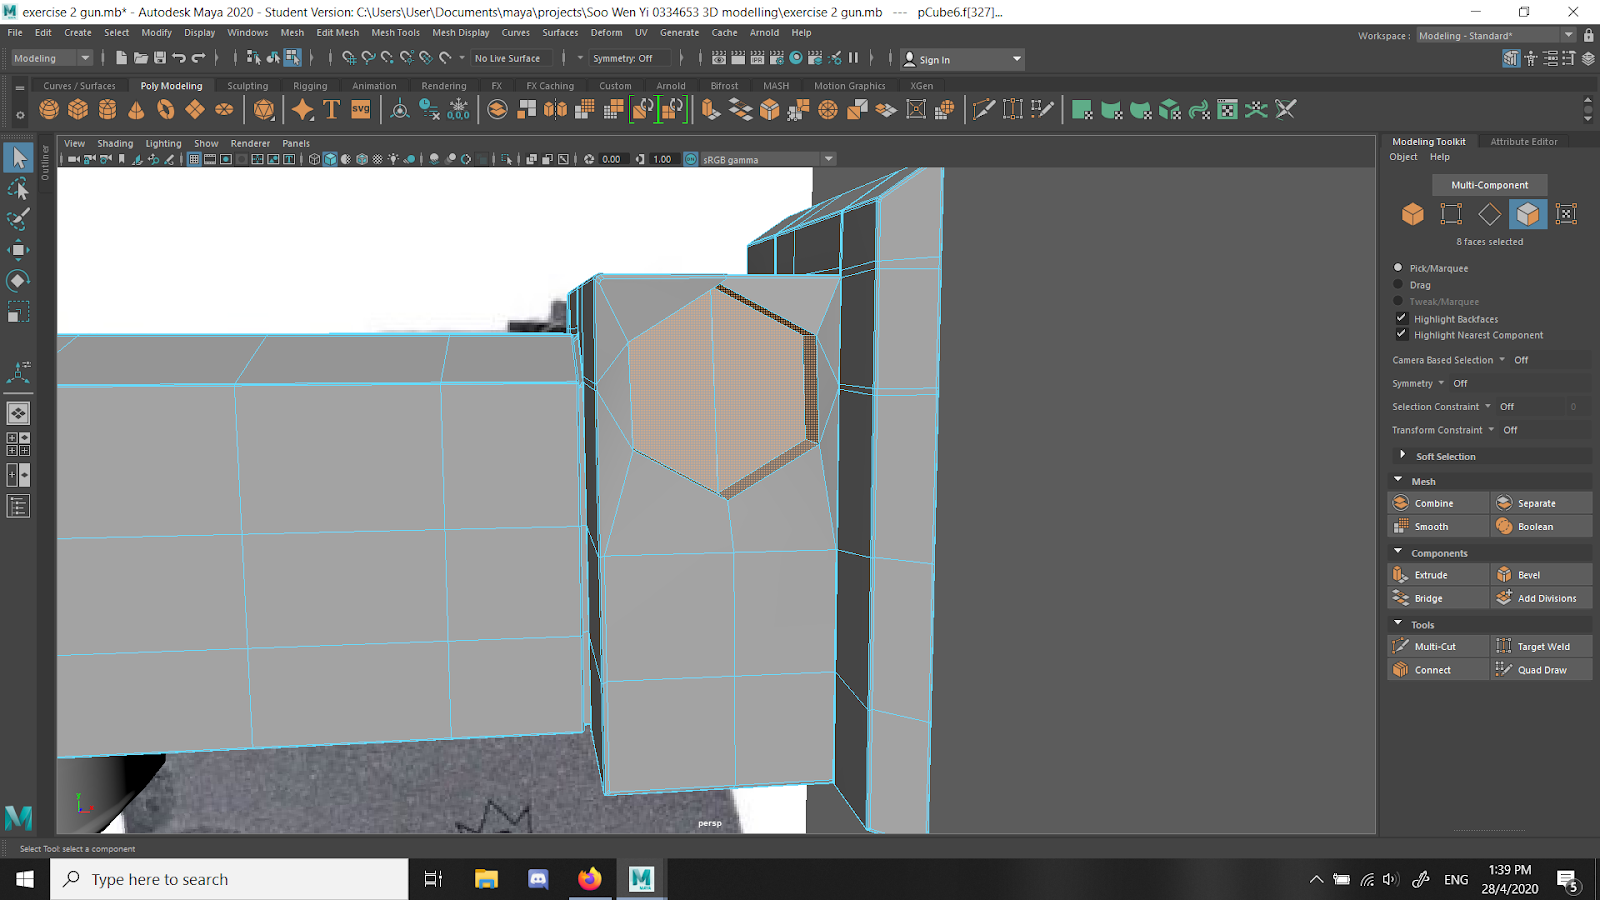
As mentioned at the start of this exercise, the grip is truly a headache for me to figure out and the topology has several triangles but I don't know how to fix it.
 |
| Fig. 2.9: wire frame of the grip |
Week 03
30 April 2020
Continue Exercise 2
There is no online class due to public holiday so I continued on finishing the gun model before the next class.
 |
| Fig. 2.10: 2nd half is combined |
 |
| Fig. 2.11: I didn't think it through to that the other half of the grip is indented so I had to fix it |
 |
| Fig. 2.12: process |
 |
| Fig. 2.13: added the final details |
And here is the final draft of the gun model, although there's some details missing, I'm happy I finished it.
 |
| Fig. 2.14: final draft gun model |
 |
| Fig. 2.15: final draft gun model |
 |
| Fig. 2.16: final draft gun model |
 |
| Fig. 2.17: final draft gun model |
 |
| Fig. 2.18: final draft gun model |
 |
| Fig. 2.19: final draft gun model, side view and top view |
Week 04
8 May 2020
Continue Exercise 2
After getting feedback from Mr Kannan, we are taught to render and here is the final gun model rendered with ambience occlusion. Some area became flat, refer to the screenshots above for what the gun looks like.
 |
| Fig. 2.20: fixed after getting feedback |
 |
| Fig. 2.21: final rendered gun |
 |
| Fig. 2.22: final rendered gun |
 |
| Fig. 2.23: final rendered gun |
 |
| Fig. 2.24: final rendered gun |
 |
| Fig. 2.25: final rendered gun |
 |
| Fig. 2.26: final rendered gun |
 |
| Fig. 2.27: final rendered gun |
 |
| Fig. 2.28: final rendered gun |
Week 05
15 May 2020
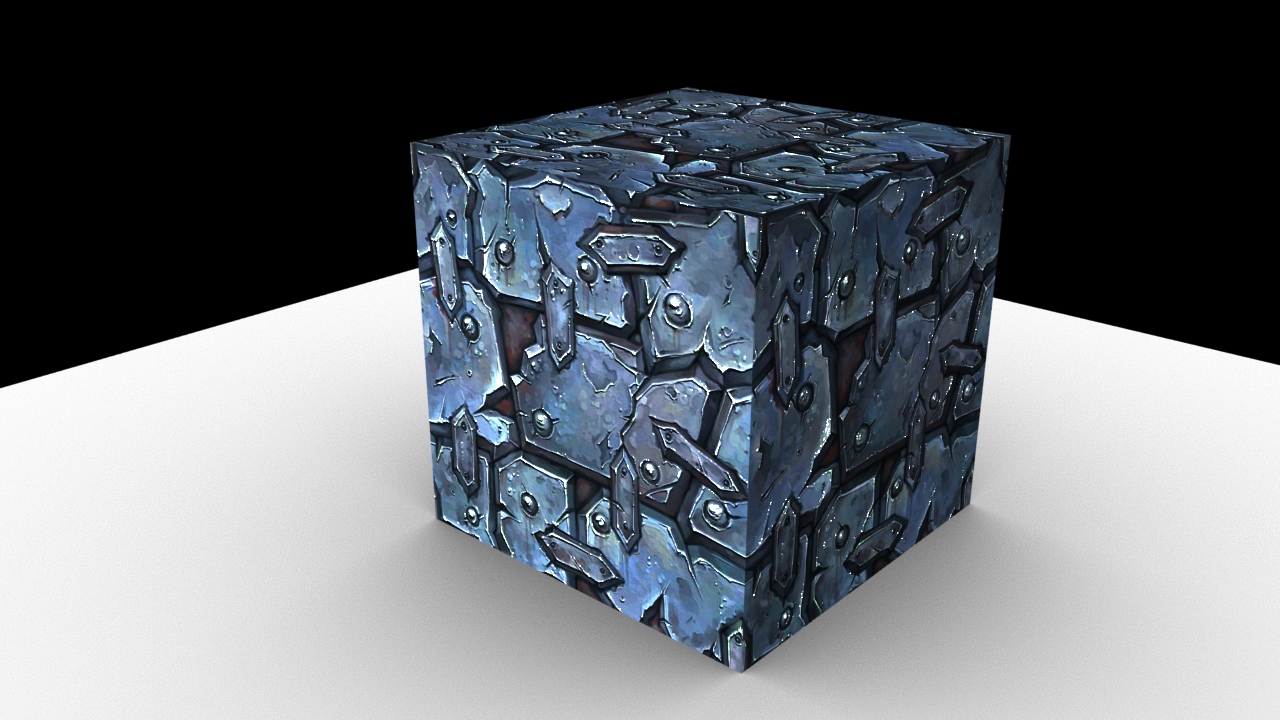
We learnt about materials and textures so I tested it out, but I've ran into a problem.
 |
| Fig. 3.1: textured applied in view port |
 |
| Fig. 3.2: rendered object is flat |
After this I tried to look for tutorials online to figure out what I was missing and doing wrong. And finally I found the problem is that I didn't put the displacement map into it.
 |
| Fig. 3.3: result of no displacement map |
 |
| Fig. 3.4: result with displacement map |
After that i realised its really rough, and I learnt something called heights in displacement attributes which effects the displacement map and how far the "dents" will go. So I played around with the amount of the height.
 |
| Fig. 3.5: different heights in displacement attributes |
Here are the final texture tests.
 |
| Fig. 3.6: textured object |
 |
| Fig. 3.7: textured object |
 |
| Fig. 3.8: 2nd textured object |
 |
| Fig. 3.9: textured objects |
After this, I applied some material to my gun and rendered it, its not perfect since the texture isn't properly laid on the object.
 |
| Fig. 4.1: gun with material |
 |
| Fig. 4.2: gun with material |
 |
| Fig. 4.3: gun with material |
 |
| Fig. 4.4: gun with material |
 |
| Fig. 4.5: gun with material |
 |
| Fig. 4.6: gun with material |
 |
| Fig. 4.7: gun with material |
 |
| Fig. 4.8: gun with material |
Week 9
12 May 2020
We are to do a head sculpt to start off in zbrush. I choose to do a skull first and do a female head.
FEEDBACK_
Week 02
24 April 2020
Chess model exercise feedback:
Not bad, beware of some of the sharper edges might want to soften it, but good start.
Week 04
8 May 2020
Gun model exercise feedback:
Some of the parts make it sharper like the rest of the gun edges, good try and start, effort is there.
REFLECTION_
EXPERIENCES
Week 01
I was looking forward to this class the most as I have never touched 3D software before, but once I get a grip on it, it was fun and I enjoyed sculpting the chess pieces.
Week 02
For the gun exercise I took my time to look into different gun designs because I know I wanted to do a gun that has a design that I liked so I have the motivation to model it and satisfaction of looking at the complete model.
Week 03
I am very happy with the outcome of the gun and I'm surprised that I finished it in time :)
Week 04
I'm very happy that Mr Kannan don't hate the model XD and although the ambient occlusion made my model very flat later on I learn its because there is no light in the scene so that's why.
Week 05
I thought putting a texture in maya was quite easy since I can follow what Mr Kannan had shown during class but that was not the case....T T
Week 09
This is my first time using zbrush and doing digital sculpting, out side of that I've also never done traditional sculpting but I have watched videos on sculpting both traditional and digital and it is quite fascinating so I am very happy to get to learn how to use this tool to sculpt.
OBSERVATIONS
Week 01
The interface of Maya was really intimidating and seems confusing but after getting use it a bit it was quite organised so that is something to get use to.
Week 02
I learned more things as I started to model the gun and discovered different methods to do things.
Week 03
I was very eager to get the model done because it was so close to being complete and I wanted to see the end result as soon as I can.
Week 04
There wasn't a lot that needed to be fix so I'm happy about that.
Week 05
I had to look online and do a lot of searches to find out what was wrong with my texture and where did I go wrong is a bit frustrating.
Week 09
I kept using maya's shortcut to navigate zbrush and still am not remembering which is a struggle but of course it would be easier later on when I use it more.
FINDINGS
Week 01
While Mr Kannan was showing us how to use Maya and sculpting the first piece, I was a bit lost at moments because I was following it, and this was because I can't multitask so my attention shifted at times.
Week 02
I think my progress is quite good and hope to keep up for the rest of the semester since this module is new and interesting.
Week 03
So far I had not run into any major problems that stopped my progress so that is good.
Week 04
I know that there are many ways to start a model after all these week which is cool.
Week 05
I found that there is still a lot to maya that I don't know which ends up with me having problems that require me to do a lot of searches online to find out why.
Week 09
I notice that references with different views are very important when sculpting to get the sculpt to be more accurate.


Comments
Post a Comment