28 May 2019 - 2 July 2019 (week 09-week 14)
Soo Wen Yi (0334653)
Digital Photography and Imaging _ Final Project
INSTRUCTIONS_
Final Project _
For the final project we have to choose a surrealistic artwork based on a link that the lecturer gave which has a few different artist's Instagram posts. We used the class time begin to select an artwork to recreate using photoshop and search for stock images to use. I looked through this artist's Instagram and got attracted to this artwork so I chose to recreate this artwork.
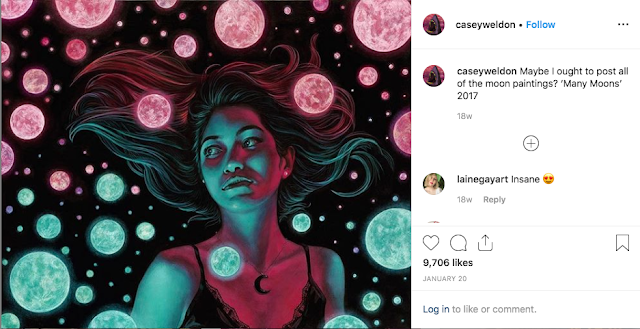 |
| 'Many Moons' the artwork that I've selected |
 |
| artist Casey Weldon's Instagram page |
As I scrolled through his Instagram page, I noticed that he had posted some of his artwork's reference pictures/process so I decided to see if he had posted the reference picture to the artwork that I've selected just to get the idea of how I'm suppose to take the photograph of the subject.
 |
| found the reference picture that he had posted |
Then i went to search for a similar stock photo but since the angle is unique in his subject I decided that it will be easier for me to just take my own photo. As for the moon I chose 2 different moon stock photos just to have a bit of variation as I remember form my project 1 with the petals on my lemons all looking the same that it wasn't believable.
 |
| photographs I used |
First I edited the moons to the match the colours of the moons on the artwork. I used an eyedropper tool to get the an accurate colour match for the moons. Then worked in layers to make the glow for the moons too.
 |
| I used overlay for the colour on top of the moon |
 |
| Did the same for the other coloured moon |
Before I started editing, I went to search for some tutorial on achieving a glowing reflection effect. I learnt to use the curves tool from a video and I decided to use that for this project.
 |
| I adjusted the perspective with perspective wrap |
 |
| using the curves tool, and I also put the original artwork on the top corner so I can easily reference it. Also did the same step for the other colour reflection on the skin. |
 |
| added the shadow below the colour relfection layers |
 |
| blurring out the shadow so its not as harsh |
 |
| 50% progress on the piece |
Before I moved onto the rest of the moons, I painted the hair highlights. Because my hair in the original photo did not have enough highlights, so i drew the hair strands both according to the original artwork and the hair laid on the original photo. Then I referred to the original artwork to place the moons.
Then I noticed that the textures of the skin of my piece is too smooth compared to the original artwork, so I decided so add some noise to the skin.
 |
| before adding noise. |
 |
| After noise added. |
I also noticed there's some rough edges on some of the moon's glow so I went and fix that. Here's the final outcome.
 |
| Final outcome |
Week 11
After showing it to the lecturers, Mr Martin said that its nice and it does look a lot like the original artwork. And Mr Jefferey was shocked when he saw the amount the layers I have because each one of the moon is on its own layer. Since we are moving onto animating it he said that it I wanted to make them all move in the same direction, I can merge them into one layer so its easier. My plan is to move the hairs and the moons in the background.
Week 12
Prior to the class I've done the animation for the hair, the moons in the middle ground and the moon at the background. So when I showed it to the lecturers they were wowed by the animation, and asked if I am satisfied with it. I was fine with everything else except for the background since I did it a bit choppy. But here's the thing I did for the animations, I used puppet tools for the hair pieces, adjusted the opacity on the middle ground moons and moved the background moons from left side to the right.
I adjusted the paths in the graphs layer so the animation is smoother. After showing the lecturers, I added the moons in the background with a stamp tool since in the original file i didn't add the moons behind the person so there's an empty space when I moved the layer.
Here's the improved animation.


Comments
Post a Comment